Use Auto DevOps to deploy an application to Amazon Elastic Kubernetes Service (EKS)
In this tutorial, we'll help you to get started with Auto DevOps through an example of how to deploy an application to Amazon Elastic Kubernetes Service (EKS).
The tutorial uses the GitLab native Kubernetes integration, so you don't need to create a Kubernetes cluster manually using the AWS console.
You can also follow this tutorial on a self-managed instance. Ensure your own runners are configured.
To deploy a project to EKS:
- Configure your Amazon account
- Create a Kubernetes cluster and deploy the agent
- Create a new project from a template
- Configure the agent
- Install Ingress
- Configure Auto DevOps
- Enable Auto DevOps and run the pipeline
- Deploy the application
Configure your Amazon account
Before you create and connect your Kubernetes cluster to your GitLab project, you need an Amazon Web Services account. Sign in with an existing Amazon account or create a new one.
Create a Kubernetes cluster
To create an new cluster on Amazon EKS:
- Follow the steps in Create an Amazon EKS cluster.
If you prefer, you can also create a cluster manually using eksctl.
Create an application project from a template
Use a GitLab project template to get started. As the name suggests, those projects provide a bare-bones application built on some well-known frameworks.
WARNING: Create the application project in the group hierarchy at the same level or below the project for cluster management. Otherwise, it fails to authorize the agent.
- On the left sidebar, at the top, select Create new ({plus}) and New project/repository.
- Select Create from template.
- Select the Ruby on Rails template.
- Give your project a name, optionally a description, and make it public so that you can take advantage of the features available in the GitLab Ultimate plan.
- Select Create project.
Now you have an application project you are going to deploy to the EKS cluster.
Configure the agent
Next, we'll configure the GitLab agent for Kubernetes so we can use it to deploy the application project.
- Go to the project we created to manage the cluster.
- Go to the agent configuration file (
.gitlab/agents/eks-agent/config.yaml) and edit it. - Configure
ci_access:projectsattribute. Use the application project path asid:
ci_access:
  projects:
    - id: path/to/application-project
Install Ingress
After your cluster is running, you must install NGINX Ingress Controller as a load balancer to route traffic from the internet to your application. Install the NGINX Ingress Controller through the GitLab Cluster management project template, or manually via the command line:
-
Ensure you have
kubectland Helm installed on your machine. -
Create an IAM role to access the cluster.
-
Create an access token to access the cluster.
-
Use
kubectlto connect to your cluster:helm upgrade --install ingress-nginx ingress-nginx \ --repo https://kubernetes.github.io/ingress-nginx \ --namespace gitlab-managed-apps --create-namespace # Check that the ingress controller is installed successfully kubectl get service ingress-nginx-controller -n gitlab-managed-apps
Configure Auto DevOps
Follow these steps to configure the base domain and other settings required for Auto DevOps.
-
A few minutes after you install NGINX, the load balancer obtains an IP address, and you can get the external IP address with the following command:
kubectl get all -n gitlab-managed-apps --selector app.kubernetes.io/instance=ingress-nginxReplace
gitlab-managed-appsif you have overwritten your namespace.Next, find the actual external IP address for your cluster with the following command:
nslookup [External IP]Where the
[External IP]is the hostname found with the previous command.The IP address might be listed in the
Non-authoritative answer:section of the response.Copy this IP address, as you need it in the next step.
-
Go back to the application project.
-
On the left sidebar, select Settings > CI/CD and expand Variables.
- Add a key called
KUBE_INGRESS_BASE_DOMAINwith the application deployment domain as the value. For this example, use the domain<IP address>.nip.io. - Add a key called
KUBE_NAMESPACEwith a value of the Kubernetes namespace for your deployments to target. You can use different namespaces per environment. Configure the environment, use the environment scope. - Add a key called
KUBE_CONTEXTwith a value likepath/to/agent/project:eks-agent. Select the environment scope of your choice. - Select Save changes.
- Add a key called
Enable Auto DevOps and run the pipeline
While Auto DevOps is enabled by default, Auto DevOps can be disabled at both the instance level (for self-managed instances) and the group level. Complete these steps to enable Auto DevOps if it's disabled:
-
On the left sidebar, select Search or go to and find the application project.
-
Select Settings > CI/CD.
-
Expand Auto DevOps.
-
Select Default to Auto DevOps pipeline to display more options.
-
In Deployment strategy, select your desired continuous deployment strategy to deploy the application to production after the pipeline successfully runs on the default branch.
-
Select Save changes.
-
Edit
.gitlab-ci.ymlfile to include the Auto DevOps template and commit the change to the default branch:include: - template: Auto-DevOps.gitlab-ci.yml
The commit should trigger a pipeline. In the next section, we explain what each job does in the pipeline.
Deploy the application
When your pipeline runs, what is it doing?
To view the jobs in the pipeline, select the pipeline's status badge. The {status_running} icon displays when pipeline jobs are running, and updates without refreshing the page to {status_success} (for success) or {status_failed} (for failure) when the jobs complete.
The jobs are separated into stages:
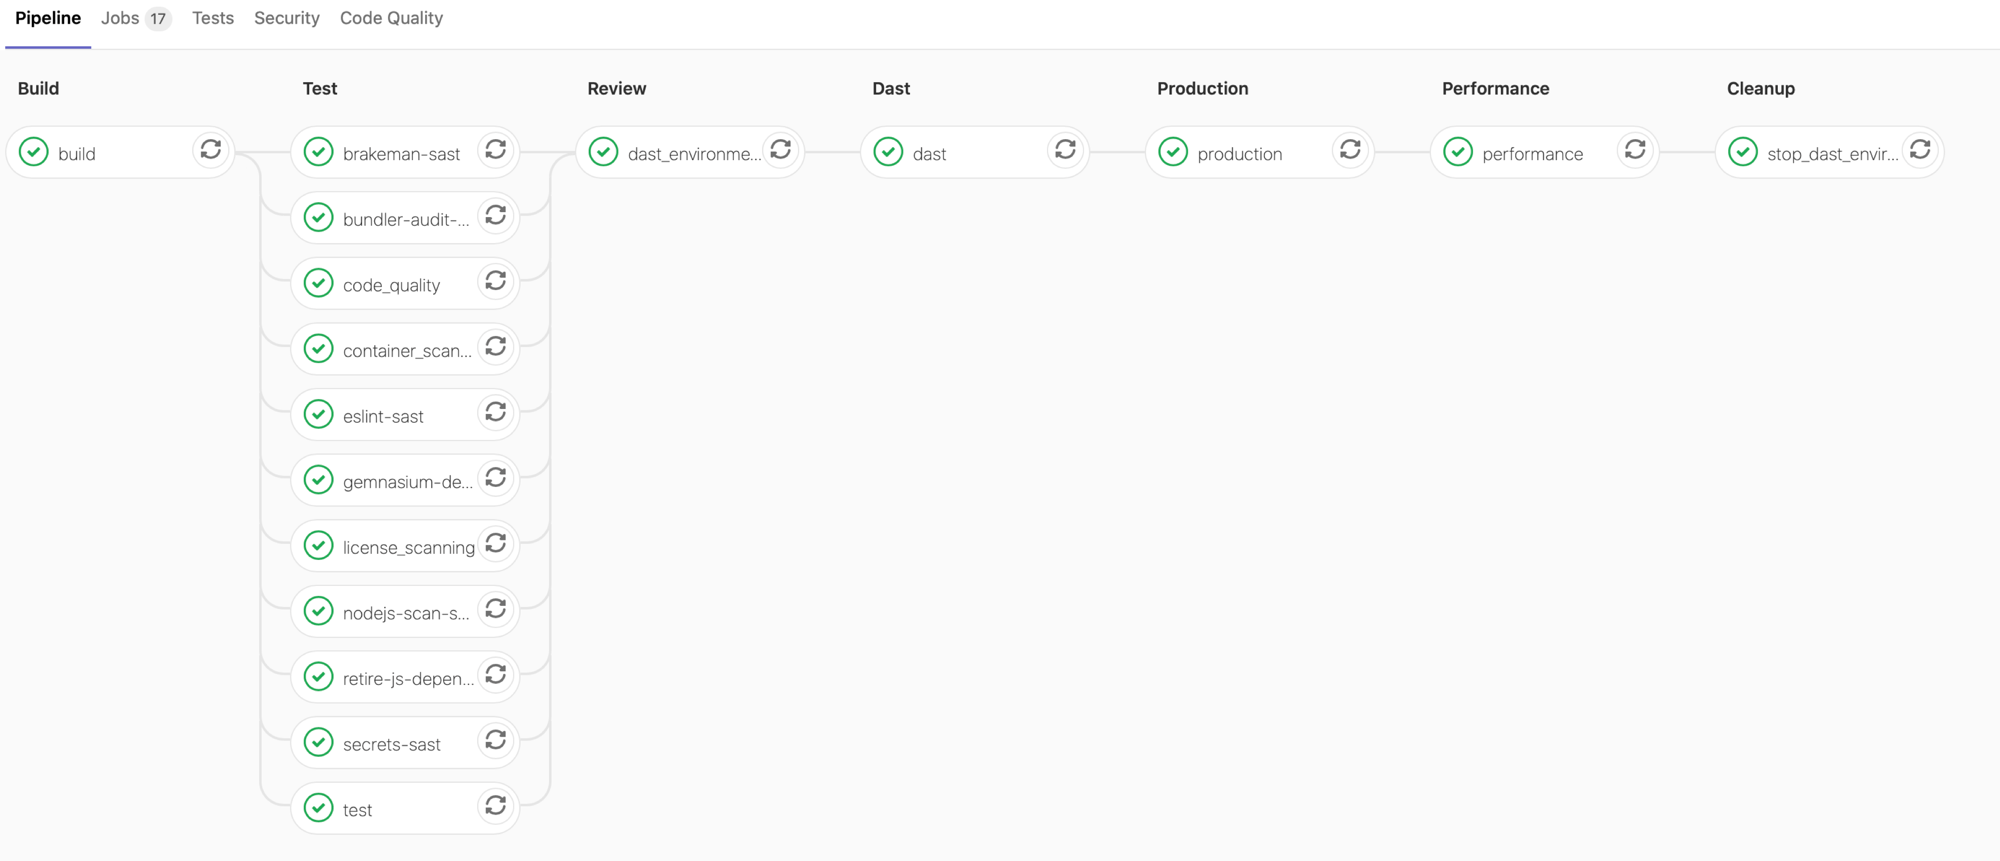
-
Build - The application builds a Docker image and uploads it to your project's Container Registry (Auto Build).
-
Test - GitLab runs various checks on the application, but all jobs except
testare allowed to fail in the test stage:- The
testjob runs unit and integration tests by detecting the language and framework (Auto Test) - The
code_qualityjob checks the code quality and is allowed to fail (Auto Code Quality) - The
container_scanningjob checks the Docker container if it has any vulnerabilities and is allowed to fail (Auto Container Scanning) - The
dependency_scanningjob checks if the application has any dependencies susceptible to vulnerabilities and is allowed to fail (Auto Dependency Scanning) - Jobs suffixed with
-sastrun static analysis on the current code to check for potential security issues, and are allowed to fail (Auto SAST) - The
secret-detectionjob checks for leaked secrets and is allowed to fail (Auto Secret Detection)
- The
-
Review - Pipelines on the default branch include this stage with a
dast_environment_deployjob. To learn more, see Dynamic Application Security Testing (DAST). -
Production - After the tests and checks finish, the application deploys in Kubernetes (Auto Deploy).
-
Performance - Performance tests are run on the deployed application (Auto Browser Performance Testing).
-
Cleanup - Pipelines on the default branch include this stage with a
stop_dast_environmentjob.
After running a pipeline, you should view your deployed website and learn how to monitor it.
Monitor your project
After successfully deploying your application, you can view its website and check on its health on the Environments page by navigating to Operate > Environments. This page displays details about the deployed applications, and the right-hand column displays icons that link you to common environment tasks:
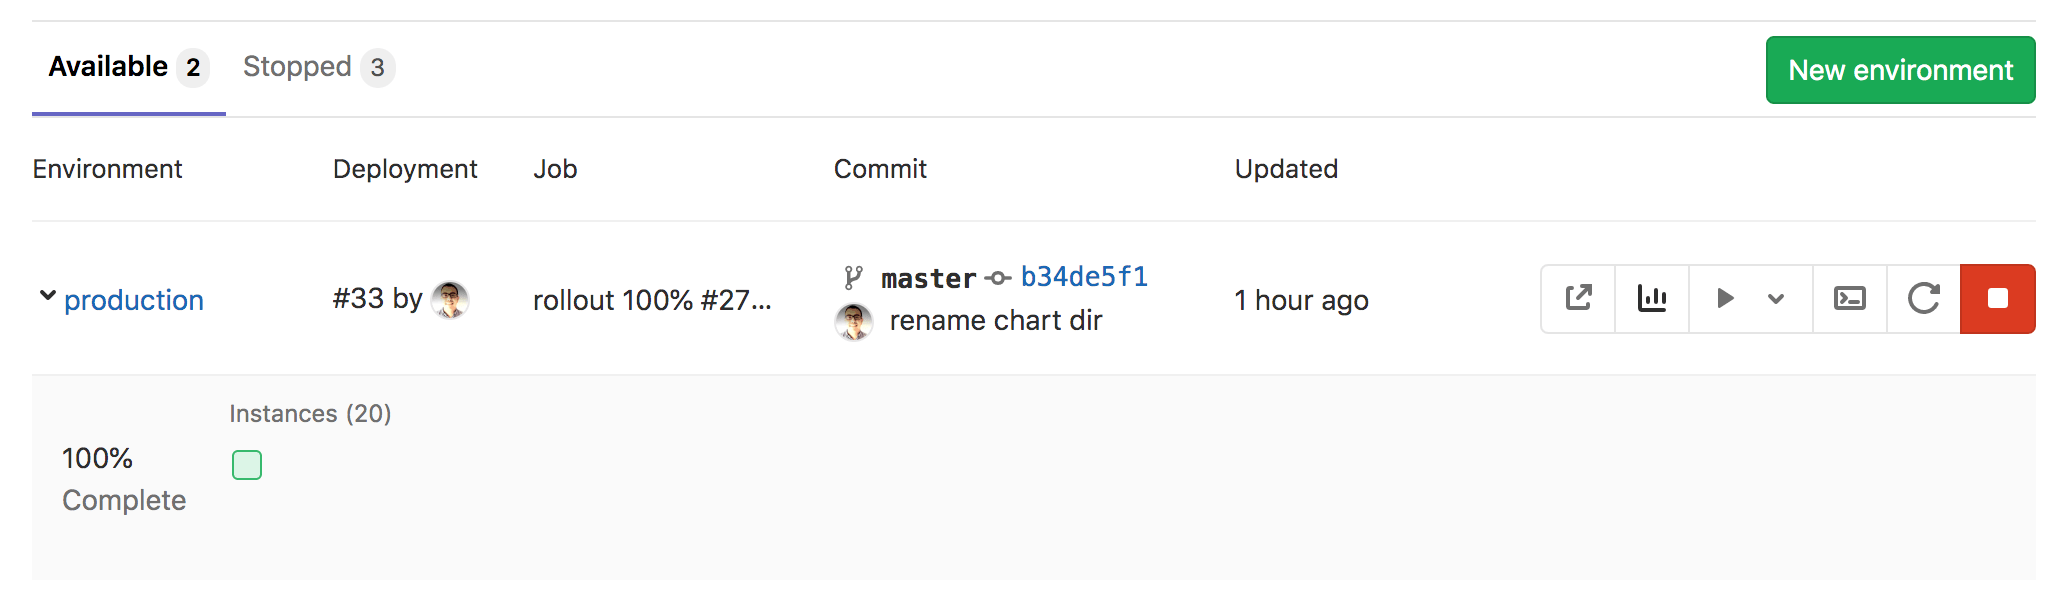
- Open live environment ({external-link}) - Opens the URL of the application deployed in production
- Monitoring ({chart}) - Opens the metrics page where Prometheus collects data about the Kubernetes cluster and how the application affects it in terms of memory usage, CPU usage, and latency
- Deploy to ({play} {chevron-lg-down}) - Displays a list of environments you can deploy to
- Terminal ({terminal}) - Opens a web terminal session inside the container where the application is running
- Re-deploy to environment ({repeat}) - For more information, see Retrying and rolling back
- Stop environment ({stop}) - For more information, see Stopping an environment
GitLab displays the deploy board below the environment's information, with squares representing pods in your Kubernetes cluster, color-coded to show their status. Hovering over a square on the deploy board displays the state of the deployment, and selecting the square takes you to the pod's logs page.
Although the example shows only one pod hosting the application at the moment, you can add
more pods by defining the REPLICAS CI/CD variable
in Settings > CI/CD > Variables.
Work with branches
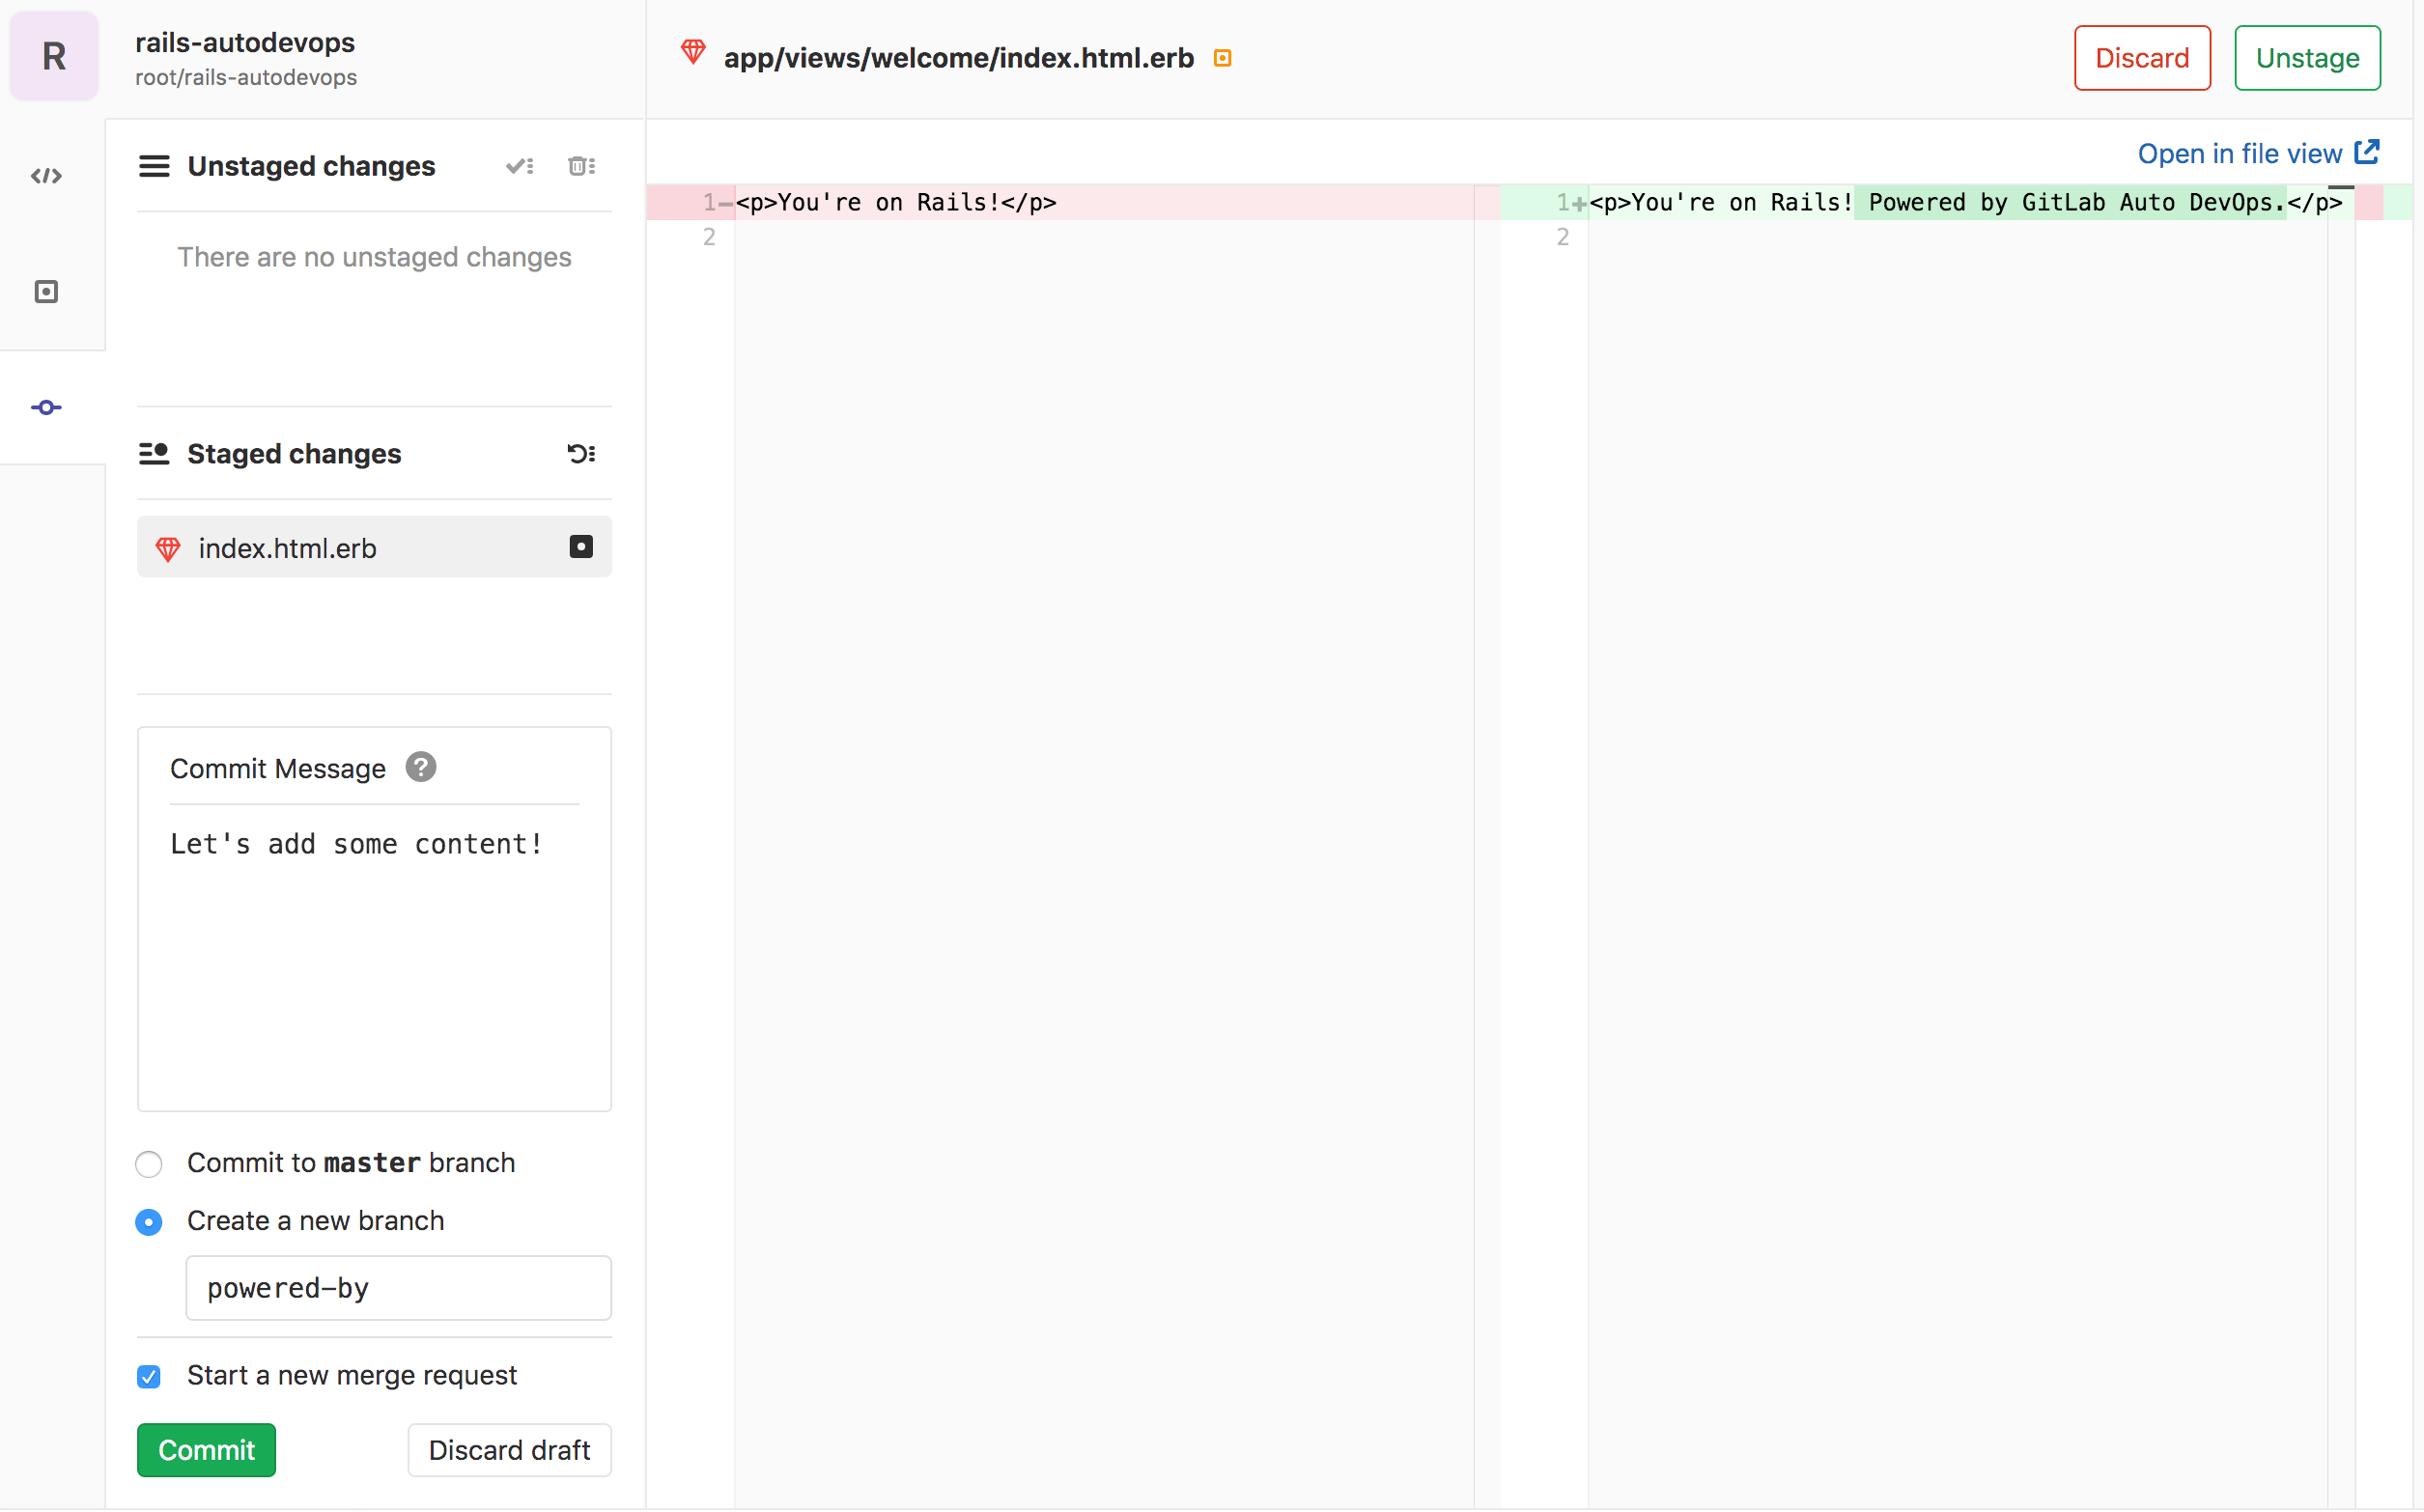
Next, create a feature branch to add content to your application:
-
In your project's repository, go to the following file:
app/views/welcome/index.html.erb. This file should only contain a paragraph:<p>You're on Rails!</p>. -
Open the GitLab Web IDE to make the change.
-
Edit the file so it contains:
<p>You're on Rails! Powered by GitLab Auto DevOps.</p> -
Stage the file. Add a commit message, then create a new branch and a merge request by selecting Commit.

After submitting the merge request, GitLab runs your pipeline, and all the jobs in it, as described previously, in addition to a few more that run only on branches other than the default branch.
After a few minutes a test fails, which means a test was
'broken' by your change. Select the failed test job to see more information
about it:
Failure:
WelcomeControllerTest#test_should_get_index [/app/test/controllers/welcome_controller_test.rb:7]:
<You're on Rails!> expected but was
<You're on Rails! Powered by GitLab Auto DevOps.>..
Expected 0 to be >= 1.

bin/rails test test/controllers/welcome_controller_test.rb:4
To fix the broken test:
- Return to your merge request.
- In the upper right corner, select Code, then select Open in Gitpod.
- In the left-hand directory of files, find the
test/controllers/welcome_controller_test.rbfile, and select it to open it. - Change line 7 to say
You're on Rails! Powered by GitLab Auto DevOps. - Select Commit.
- In the left-hand column, under Unstaged changes, select the checkmark icon ({stage-all}) to stage the changes.
- Write a commit message, and select Commit.
Return to the Overview page of your merge request, and you should not only see the test passing, but also the application deployed as a review application. You can visit it by selecting the View app {external-link} button to see your changes deployed.
After merging the merge request, GitLab runs the pipeline on the default branch, and then deploys the application to production.
Conclusion
After implementing this project, you should have a solid understanding of the basics of Auto DevOps. You started from building and testing, to deploying and monitoring an application all in GitLab. Despite its automatic nature, Auto DevOps can also be configured and customized to fit your workflow. Here are some helpful resources for further reading: