Location-aware public URL (PREMIUM SELF)
With Geo proxying for secondary sites, you can provide GitLab users with a single URL that automatically uses the Geo site closest to them. Users don't need to use different URLs or worry about read-only operations to take advantage of closer Geo sites as they move.
With Geo proxying for secondary sites web and Git requests are proxied from secondary sites to the primary.
Prerequisites
This example creates a gitlab.example.com subdomain that automatically directs
requests:
- From Europe to a secondary site.
- From all other locations to the primary site.
The URLs to access each node by itself are:
-
primary.example.comas a Geo primary site. -
secondary.example.comas a Geo secondary site.
For this example, you need:
- A working GitLab primary site that is accessible at
gitlab.example.comandprimary.example.com. - A working GitLab secondary site.
- A DNS zone managing your domain. Although the following instructions use AWS Route53 and GCP cloud DNS, other services such as Cloudflare can be used as well.
If you haven't yet set up a Geo primary site and secondary site, see the Geo setup instructions.
AWS Route53
In this example, you use a Route53 Hosted Zone managing your domain for the Route53 setup.
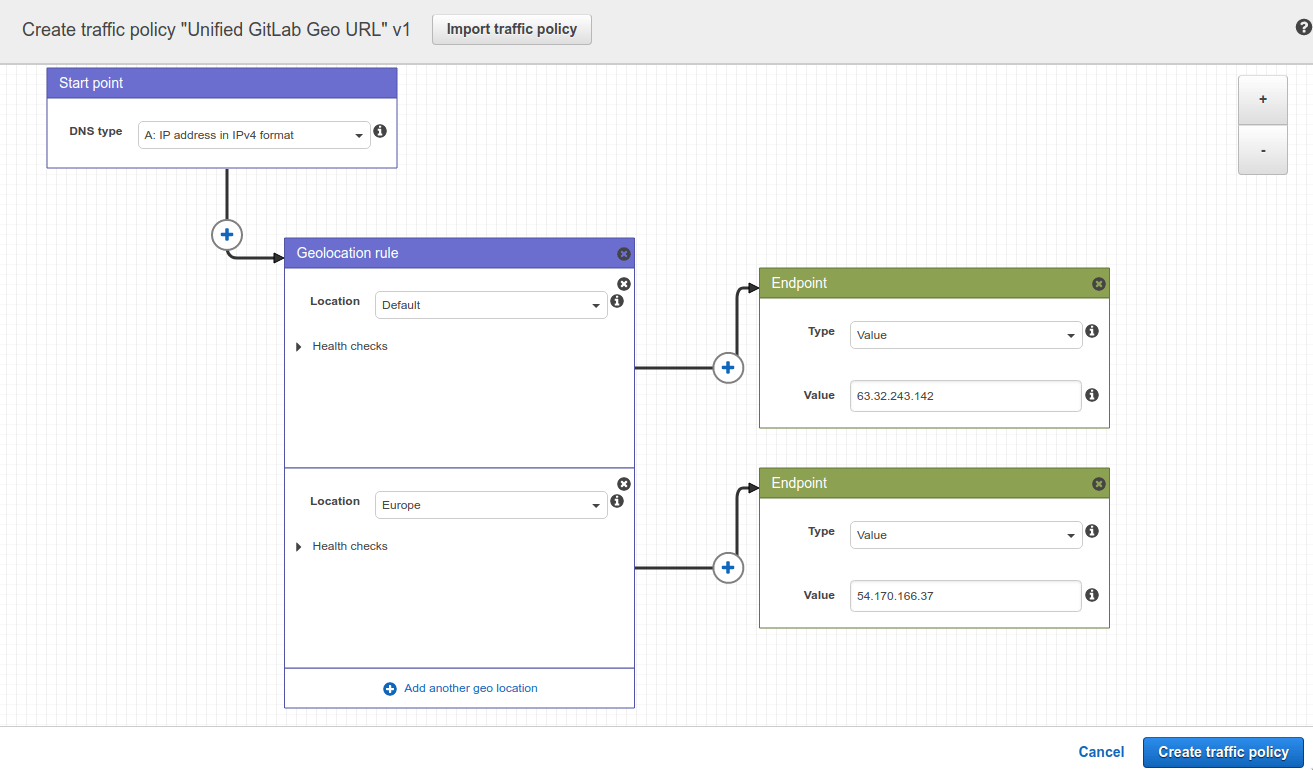
In a Route53 Hosted Zone, traffic policies can be used to set up a variety of routing configurations. To create a traffic policy:
-
Go to the Route53 dashboard and select Traffic policies.
-
Select Create traffic policy.
-
Fill in the Policy Name field with
Single Git Hostand select Next. -
Leave DNS type as
A: IP Address in IPv4 format. -
Select Connect to..., then Geolocation rule.
-
For the first Location:
- Leave it as
Default. - Select Connect to..., then New endpoint.
- Choose Type
valueand fill it in with<your **primary** IP address>.
- Leave it as
-
For the second Location:
- Choose
Europe. - Select Connect to... and select New endpoint.
- Choose Type
valueand fill it in with<your **secondary** IP address>.

- Choose
-
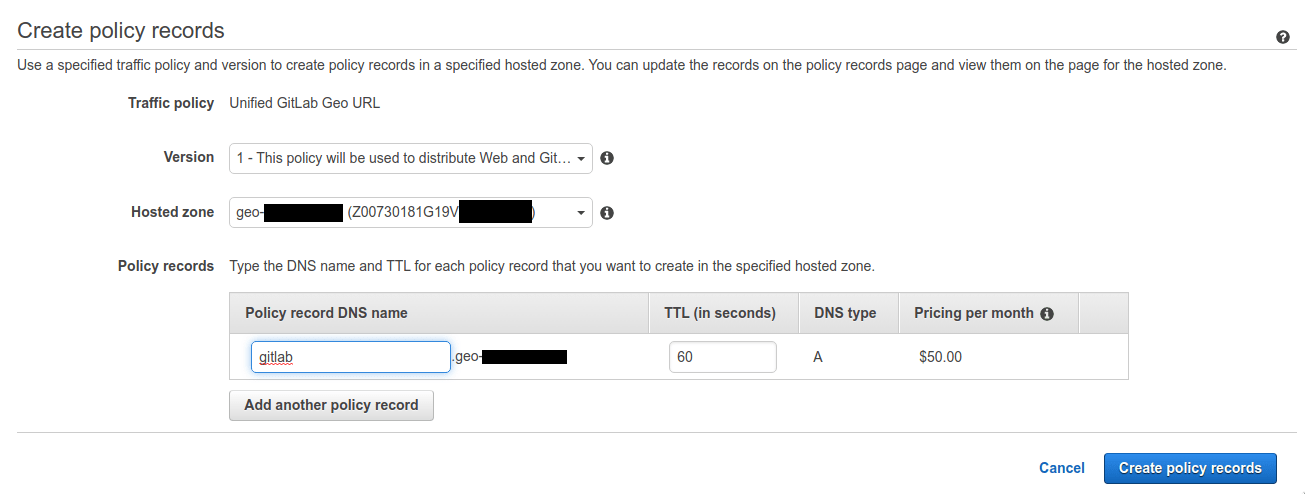
Select Create traffic policy.
-
Fill in Policy record DNS name with
gitlab. -
Select Create policy records.
You have successfully set up a single host, like gitlab.example.com, which
distributes traffic to your Geo sites by geolocation.
GCP
In this example, you create a GCP Cloud DNS zone managing your domain.
When creating Geo-Based record sets, GCP applies a nearest match for the source region when the source of the traffic doesn't match any policy items exactly. To create a Geo-Based record set:
- Select Network Services > Cloud DNS.
- Select the Zone configured for your domain.
- Select Add Record Set.
- Enter the DNS Name for your Location-aware public URL, for example,
gitlab.example.com. - Select the Routing Policy: Geo-Based.
- Select Add Managed RRData.
- Select Source Region: us-central1.
- Enter your
<**primary** IP address>. - Select Done.
- Select Add Managed RRData.
- Select Source Region: europe-west1.
- Enter your
<**secondary** IP address>. - Select Done.
- Select Create.
You have successfully set up a single host, like gitlab.example.com, which
distributes traffic to your Geo sites using a location-aware URL.
Enable Geo proxying for secondary sites
After setting up a single URL to use for all Geo sites, continue with the steps to enable Geo proxying for secondary sites.